Monday, May 26, 2014

Taking the Summer Off

Hi, Readers-
I just wanted to let you know that I will be taking the summer off of blogging to spend with my 2 beautiful children.  I will see you again in the fall!!!!!  Have a wonderful end of your school year and enjoy your summer!

Saturday, April 5, 2014

Lifecycle of a Chicken Part 2

I must confess…I’ve got a little bit of Ms. Frizzle in me! Not the whole custom-embroidered-solar-system-jumper sort of way, but I’m definitely not afraid to add dashes of her gaudy fashion sense to my wardrobe! Hey, it’s all in the name of fun for the kiddos, right?!
So during the week we welcome our newest little classmates, I simply must wear my “chick shoes”. Want a pair of your own? Just attach a felt chick sticker to each shoe (the ones below are from Michaels). 

Ahhhh…The Friz would be so proud!
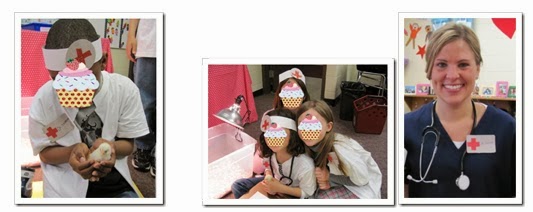
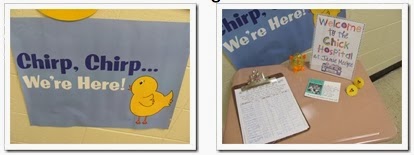
The fashion fun doesn’t stop here, though! When the chicks come, we go all out! One day during the week of their arrival, we set up visiting hours. We have a hospital sign-in sheet, nametags for visitors, and the kids are decked in their doctor gear! To make their doctor coats simply cut a white t-shirt up the front, add a nametag, a headband, and toss in a stethoscope and they're all set!
        
Even the teachers get involved in the theme by dressing up in scrubs!
Look at this banner I ordered from Vista Print!! It was the perfect addition to the nursery entrance and sign in!

And, to top off my big ‘ole Vista Print purchase…
Birth announcements with their first “family” photo, hatching details, and chick characteristics!!
Oh…one more purchase…“Proud Parent” stickers:
Too cute!!

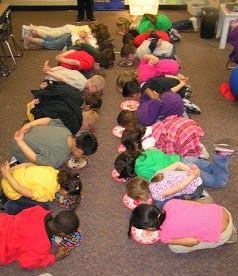
We said good-bye to our chicks by having Chicken Fest! We played games such as “Hot Chicken” – AKA Hot Potato where we played the “Chicken Dance”, of course, and the winners got to keep the rubber chicken we used as the “potato”:


The hens and roosters also tried “hatching eggs” by sitting on a balloon:

They also participated in the “This looks easy but it’s actually super-duper hard” Egg Roll by rolling a balloon with their nose:

Some kids thought a big “egg” would be easier, others thought a small one would work better:


 And, the #1 kid-favorite…Chicken Feed (eating cereal with their hands behind their backs and pecking it like a chicken):  

But soon the fun had to end and it was time to say good-bye to our newest little classmates. It was off to the farm for them! If you are the one bringing the chicks to the farm, be sure to take pictures of their new home! It definitely helped my students feel better seeing photos of their new friends and where they would be living!


Saturday, March 22, 2014

Lifecycle of a Chicken Part 1

Are you getting ready to welcome your hatched chicks? If so, check out these ideas! Leave little clues outside the morning of their arrival! Can you imagine the kid’s faces as the bus pulls into school if these little chicks are on your school’s marquis!

Or on the entrance doors as they walk in!

Be sure to have your camera or video recorder up and running as the kids enter the classroom—getting their “mad dash” to the incubator will definitely be one of the most exciting things for them (and for you, too!).


Introducing…our first born, Carlos! 


Check back soon for more chick ideas! Click here for the 23-file Lifecycle of a Chicken Unit.

Wednesday, February 26, 2014

State Testing Survival Kit

Well, it's that time of year for state testing!  Where we live, it's the 3rd through 5th graders who are getting ready to show off all they know.  Their #2 pencils are sharp, their brains are full, and they are ready to rock their test!  My daughter and her class are getting ready to start their testing this week and that got me thinking...what could her and I make for her class that would motivate them to try their best and bring a smile to their face during the upcoming week?  That's when the Testing Survival Kit came to mind.

My daughter and I had so much fun crafting together!  This was also a great opportunity for me to talk with her about doing nice things for others.  Let me tell you, she is so excited to bring the Testing Survival Kit to school tomorrow! Although we put this together for the state testing, you can give any of these items to your students prior to a test or sneak them into your own child's lunch box as a little "good-luck" wish. 
Here are the encouraging goodies for each day of testing:
Day 1:  Motivational Water Bottles.  I had my own students decorate the labels found in Becky's Rock the Test file.
Click the picture for many other cute ideas from Dots-n-Spots
Thanks for the cute idea, Becky! 

 Day 2:  "Smart Cookie" Treats
We used a 1 7/8 inch scalloped paper punch to cut the "You're one smart cookie!" messages, added a cookie to a small baggie, closed it with a piece of ribbon, and hot glued the message to the knot.


Day 3:  Brain Boosting Vitamins
My daughter and I added the candy to a Mason Jar.  Finally, we attached a label and Dr. Hershey's Brain Boosting Prescription!

Day 4:  Smartie Pants
This idea has been done before, but it was so much fun to put them together with my own little test-taker!  She was excited to {carefully} use the paper cutter to cut 2.5 x 3.5 inch pieces of cardstock and I hot glued the candy to the bottom portion of the paper. 
Next, we cut the messages using a 2 x 2 inch round paper punch.  When using punches to cut something you've printed, put the punch upside-down so you can see the image you are cutting.

We glued the messages to the cards and added a pair of pants for some extra cuteness.  I have an old-school Sizzix machine (that's where I got the overalls), however, you could simply cut a pair of pants out of scrapbook paper.

After the brain-boosting goodies were packed up and the hot glue gun was unplugged, I finally sat down for a sweet treat with my own smart little cookies! 
Click here for a copy of the testing goodie labels to create your own testing kit!